C++
PROJECT 1.3.4
Change colors
Arduino project
For our projects, we will use Arduino Uno. For programming our Arduino Board we will need a software Arduino IDE. Please download the software from the next link: Download Arduini IDE
We will use the following electrical components:
| Arduino Uno |
|
1 |
| Red LED |
|
1 |
| Blue LED |
|
1 |
| White LED |
|
1 |
| Pushbutton |
|
3 |
| Resistors (1 kO) |
|
4 |
| BreadBoard |
 |
1 |
| Wires |
 |
18 |
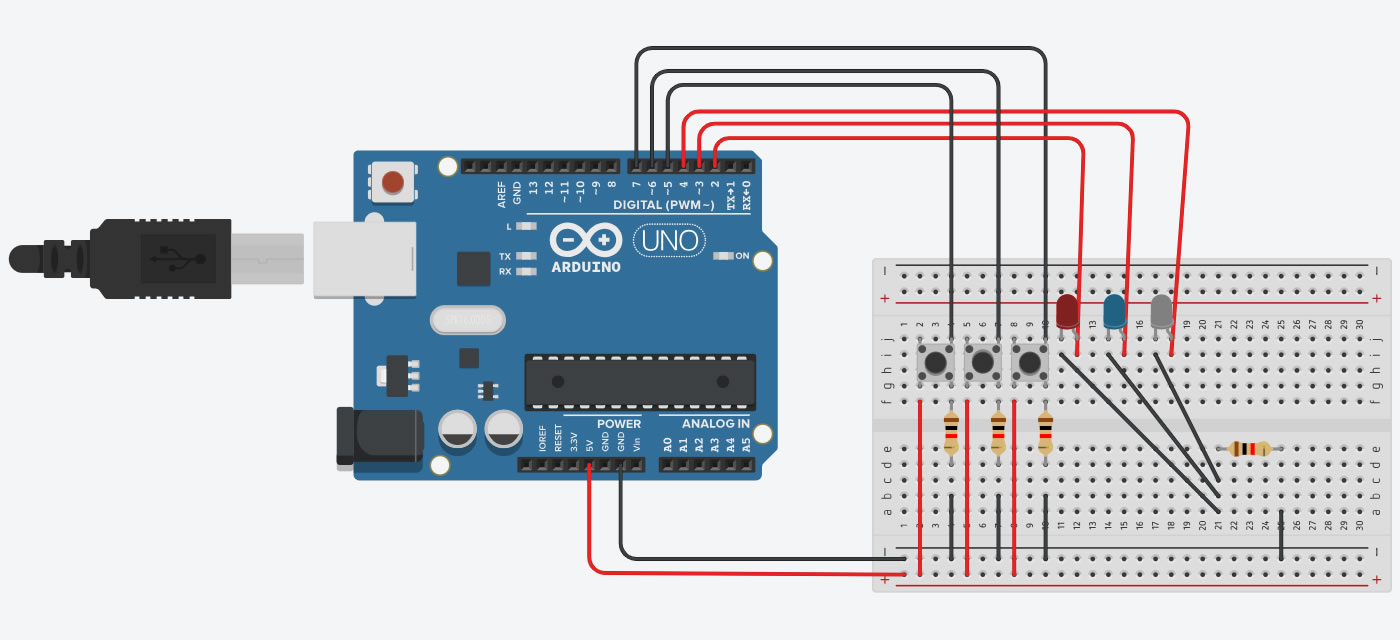
Using the electrical components, BreadBoard and Arduino Uno Make the next electrical connections.
LEDs have one lead that is longer than the other. This longer lead is the anode (+), and the shorter is the cathode (-).Â

Connect the Arduino to the PC using a USB cable. Open the Arduino IDE. Click Select Board, choose Arduino Uno and serial port from the list. Click OK.

Let's start coding. First, we have to set which pin will be for input - for Buttons, and which for output - for LEDs. We have 3 buttons - so we will have 3 pins for input (5, 6 and 7). We have 3 Leds - so we will have 3 pins for output (2, 3 and 4).
Write the next code after void setup(). This is setup code that will run once.
void setup()
{
pinMode(5, INPUT);
pinMode(6, INPUT);
pinMode(7, INPUT);
pinMode(2, OUTPUT);
pinMode(3, OUTPUT);
pinMode(4, OUTPUT);
}

Now let's make LEDs flash after we click the button.
If we click the button that is connected to pin 5, the LED that is connected by the anode to pin 2 will flash. Other LEDs will be turned off.
If we click the button that is connected to pin 6, the LED that is connected by the anode to pin 3 will flash. Other LEDs will be turned off.
If we click the button that is connected to pin 7, the LED that is connected by the anode to pin 4 will flash. Other LEDs will be turned off.
if (digitalRead(5) == HIGH) {
// turn 1 LED on, others off:
digitalWrite(2, HIGH);
digitalWrite(3, LOW);
digitalWrite(4, LOW);
}
if (digitalRead(6) == HIGH) {
// turn 1 LED on, others off:
digitalWrite(3, HIGH);
digitalWrite(2, LOW);
digitalWrite(4, LOW);
}
if (digitalRead(7) == HIGH) {
// turn 1 LED on, others off:
digitalWrite(4, HIGH);
digitalWrite(2, LOW);
digitalWrite(3, LOW);
}
It is time to upload our code to Arduino. Click Sketch and after click Upload.

After the code is uploaded you can click the buttons and see how your first Arduino project works!
Conclusion:
We have created our first Android project using the Arduino Uno and Arduino IDE. Initially, we connected the components using the BreadBoard, then we wrote the programming code in C++ using the Arduino IDE.
We learned how to work with the pins of Arduino. How to set Input and Output pins and how to work with buttons.
For flashing the LEDs, we used the If operator.
We have learned how to deploy our app to the Arduino Uno.